Welcome to our blog article, where we discuss the complex field of web maintenance, focusing on an often-overlooked aspect: finding and troubleshooting error logs. In the changing cyberspace of 2024, ensuring your Web maintenance runs smoothly is critical. As technology advances, so do the challenges of maintaining a strong online presence.
Understand the different kinds of errors
The first step in web testing error log analysis is to identify the various sorts of mistakes that might occur in online applications. Errors fall into four categories: syntax errors, runtime errors, logic errors, and external errors. Syntax mistakes occur when there is erroneous or missing code, such as semicolons or parentheses. Unexpected occurrences or situations, such as division by zero or memory overflow, might result in runtime errors.
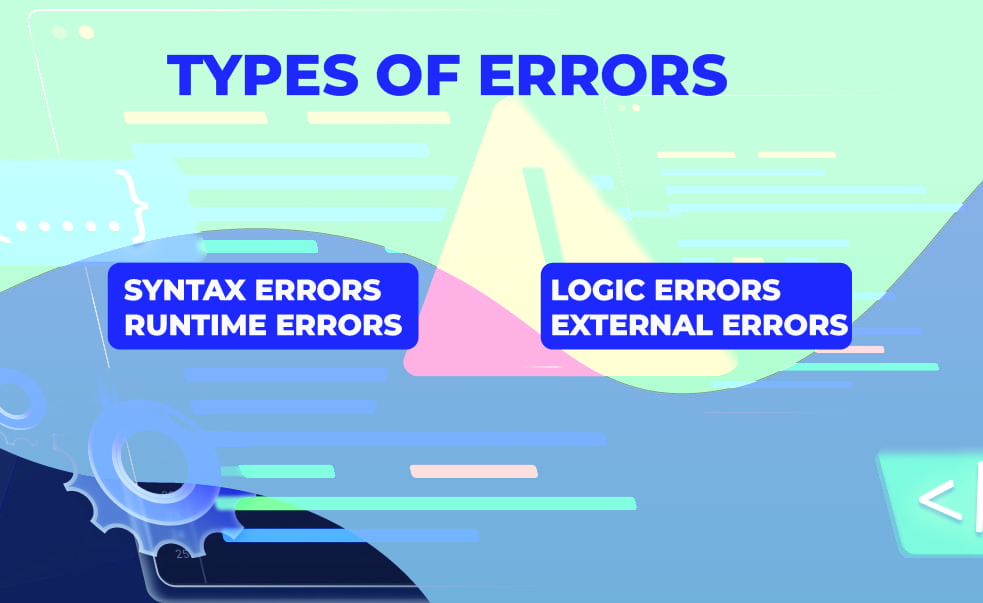
Faulty methods or designs, such as improper computations or loops, can result in logic mistakes. External errors are triggered by events outside of the web application, such as network outages or server unavailability. Each sort of issue necessitates a distinct strategy for debugging and testing.
Use log management tools
The second phase in web testing error log analysis is to employ log management solutions that enable you to collect, store, filter, search, and visualise error logs. Log management technologies automate log gathering and analysis, saving you time and effort. They can also provide you with insights and notifications to help you detect and fix faults more quickly.
Identify the primary source of errors
The third phase in web testing error log analysis is to discover the underlying causes of problems and assess their effect and severity. This allows you to prioritise and correct the most significant and common issues first. To determine the underlying causes of problems, review the error messages, stack traces, and context information in the error logs. You must also duplicate the mistakes in various contexts and circumstances to ensure that they occur and behave as expected.
Fix and test errors

The fourth phase in web testing error log analysis is to rectify and test problems that were identified through root cause analysis and impact assessments. This might assist you in increasing the quality and dependability of your online application. To resolve and test mistakes, you must adhere to web development and testing best practices such as version control, review of code, unit testing, test integration, and regression testing. You must also document and share the issue fixes and test findings to your team members.
Keep in mind the Feedback
The final phase in web testing error log analysis is incorporating user, client, and peer input into your web testing techniques. This will assist you in aligning your web testing objectives and expectations with the requirements and preferences of your target audience. To include input, you must gather and analyse user feedback from a variety of sources, such as surveys, reviews, ratings, comments, and social media. You must also seek and respond to customer input through different methods, such as emails, calls, discussions, or reports.

Conclusion
To summarise, understanding the skill of finding and troubleshooting error logs is critical for running a high-performing website in 2024 and beyond. Adopting proactive Web maintenance techniques not only ensures a consistent user experience but also protects your online reputation and company continuity. Remember that each error log is a chance for progress. So, with the correct tools and expertise, you can confidently begin the process of optimising the performance of your website. Stay tuned for further insights and recommendations to boost your internet presence.
1. Recognize an issue or warning in the debug log.2. Make a note of the error code associated with the item.3. To understand the precise issue, look up the error code’s meaning.4. Refer to different tutorials or resources to find solutions for correcting that specific mistake.
1. Go to the wp-content folder.2. Locate the debug.log file.3. Find an issue or warning in the debug log.4. Take note of the error code for the item and look up its meaning.5.Refer to additional tutorials or resources to find methods to solve that specific issue.